01 — Build
Build the camera
A low-cost underwater camera using off-the-shelf components and a repurposed glass jar. Two versions — choose based on your budget, experience, and how much kit you have access to.
Lite — ESP32-CAM
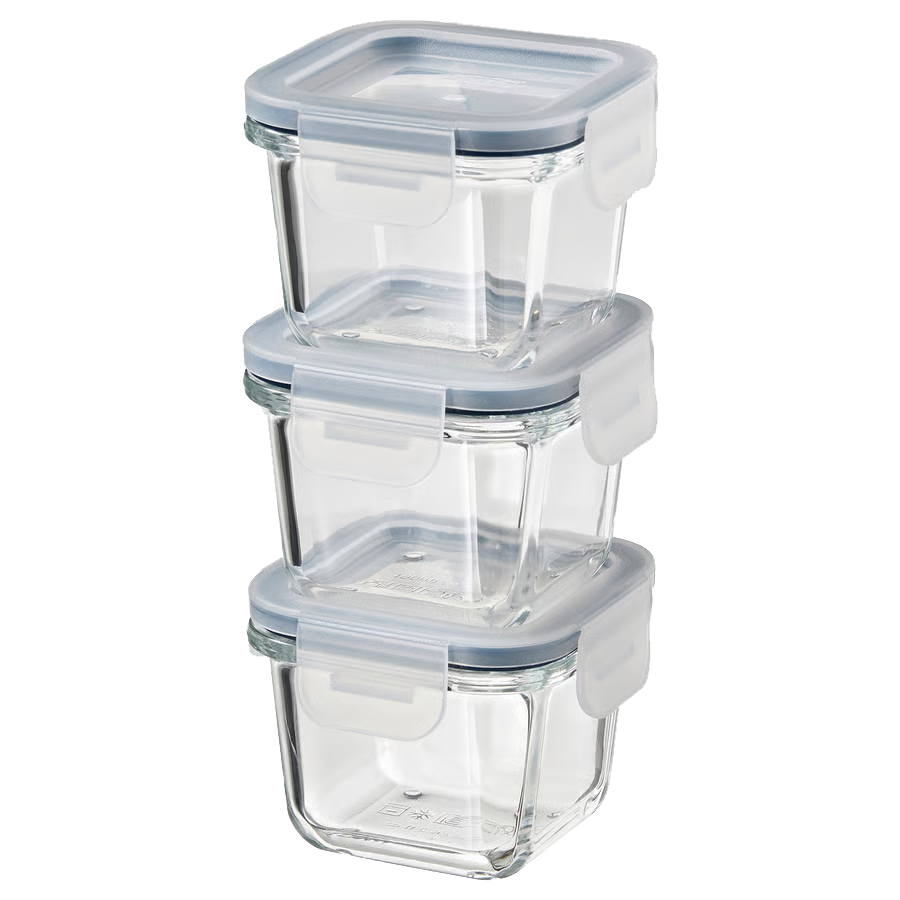
IKEA 365+ 180ml — available new (£6 for a pack of 3) or reused from eBay, Vinted, or charity shops.
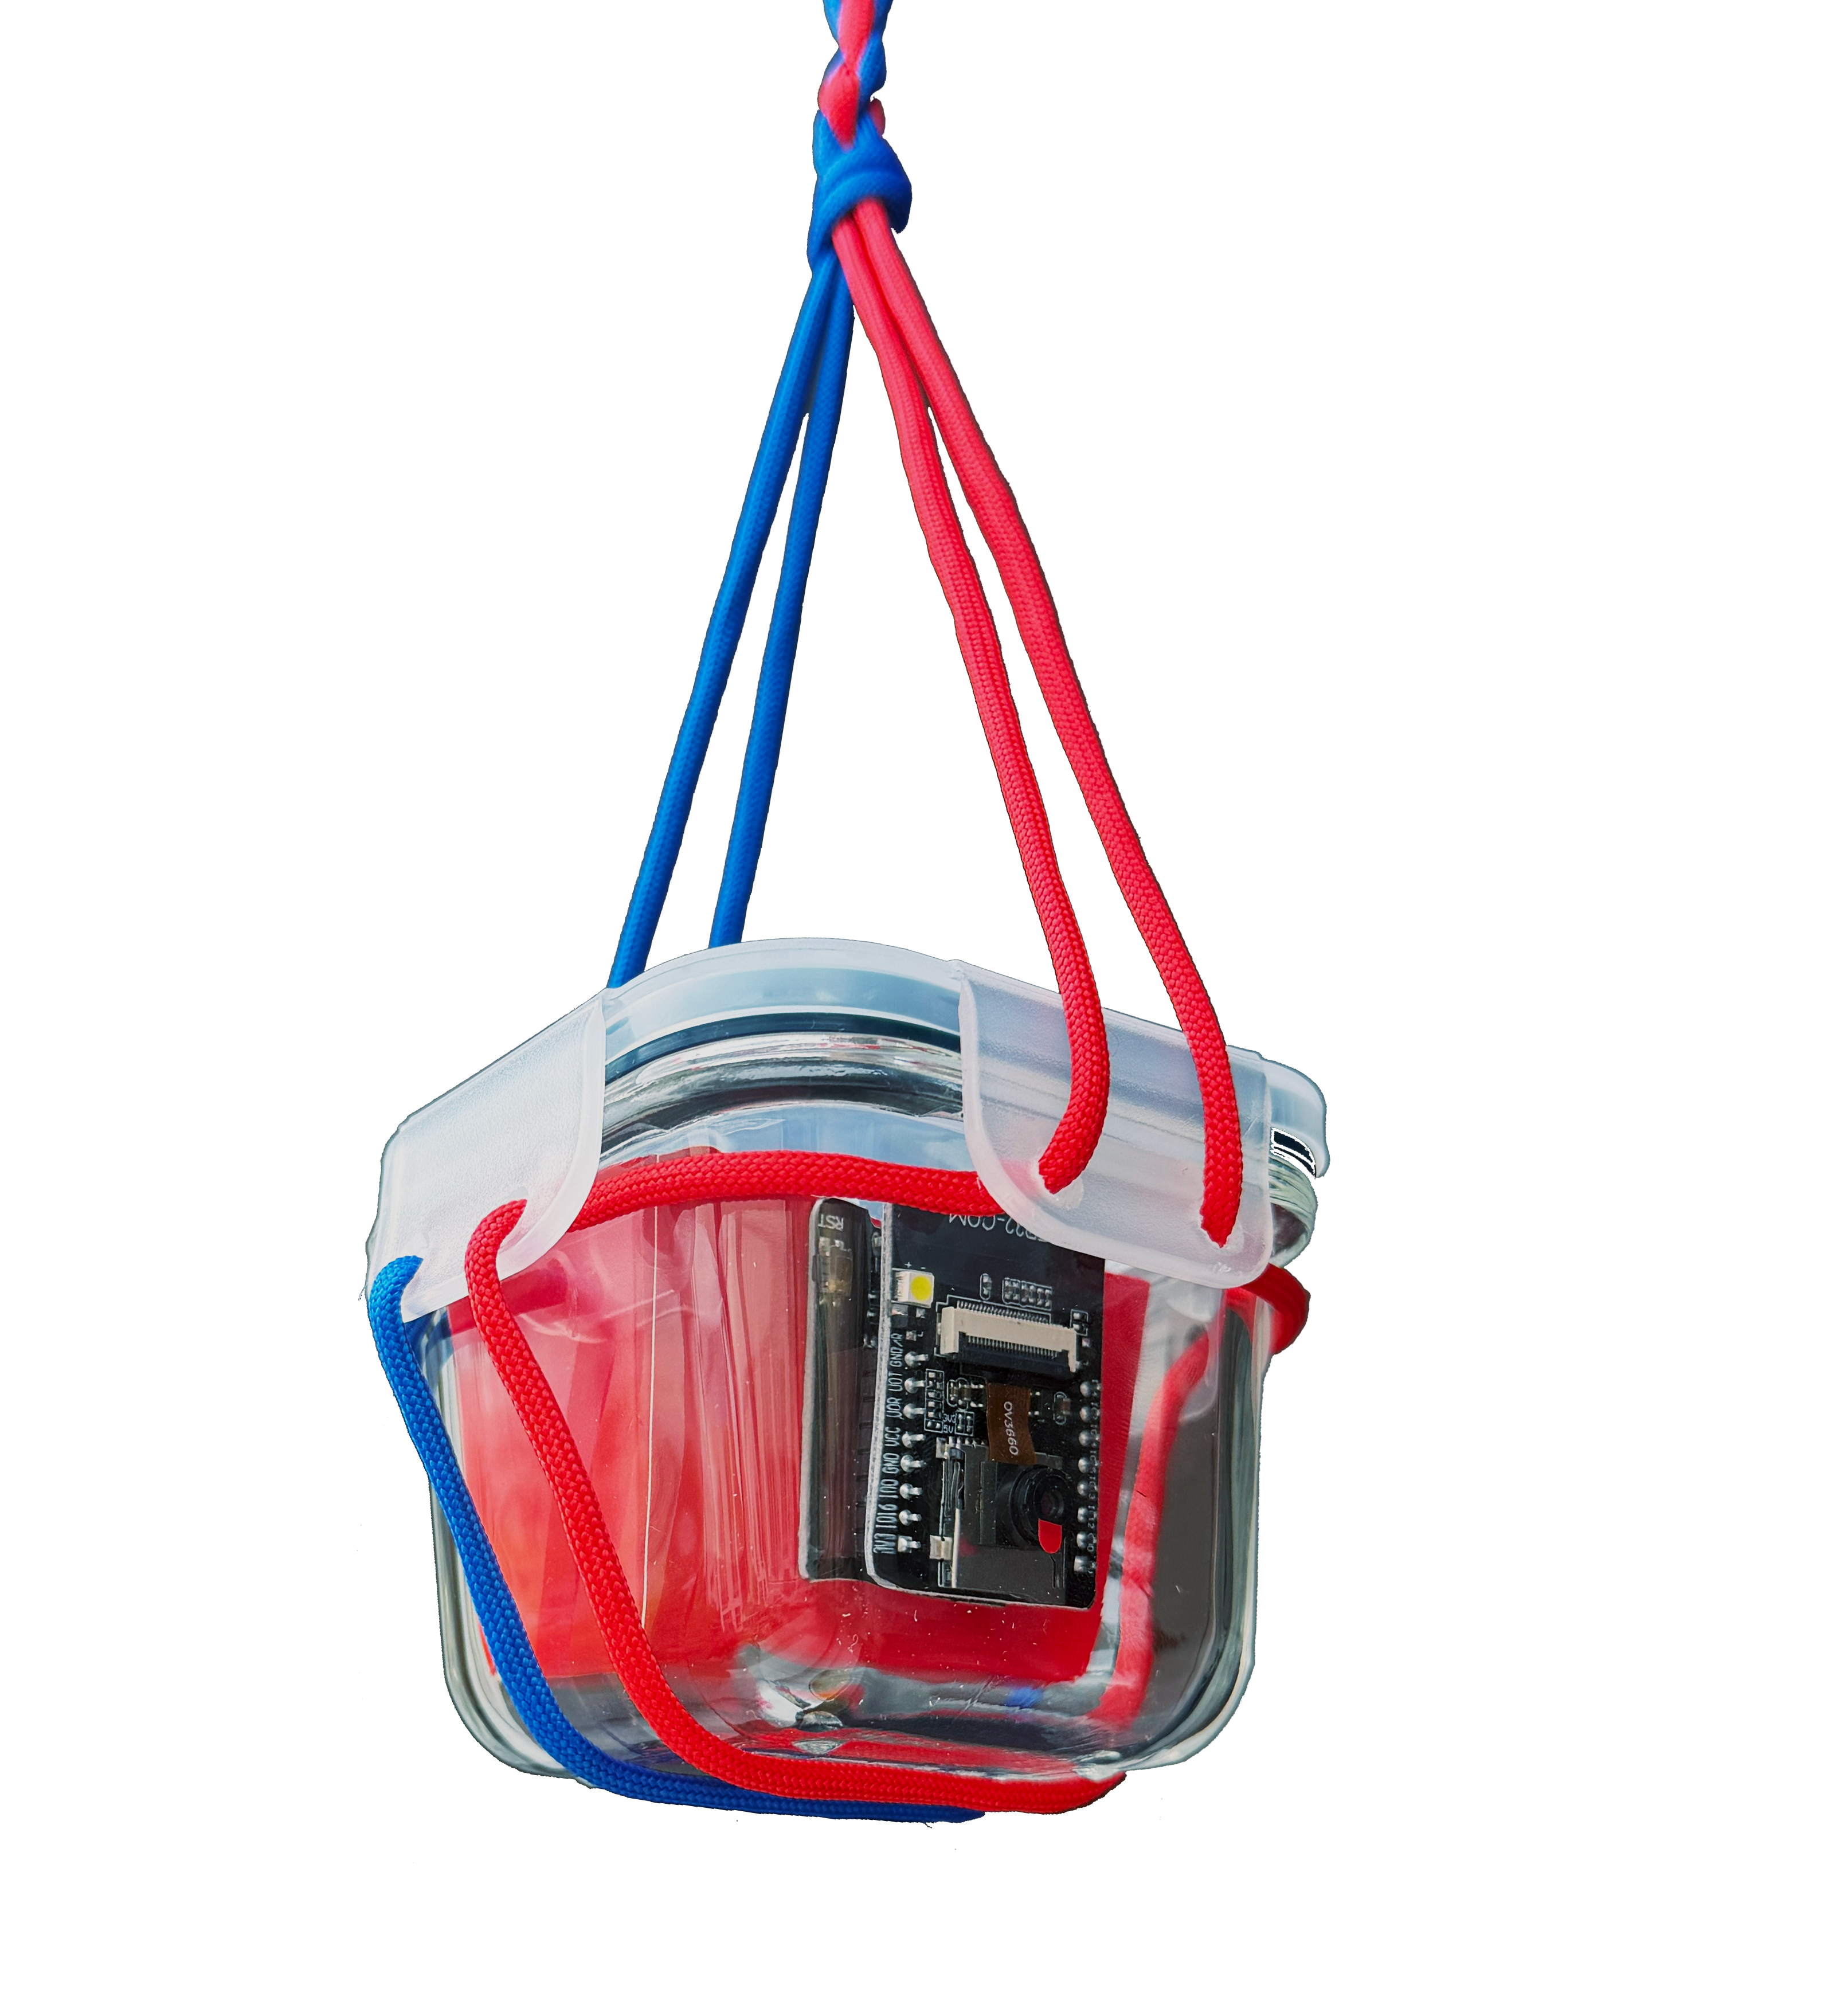
The Lite version uses an ESP32-CAM microcontroller — a single board with a built-in camera, Wi-Fi, and enough processing power to stream live video. Housed in an IKEA 365+ 180ml glass jar, it requires no soldering and can be built in an afternoon with no specialist tools. Both versions offer equivalent waterproofing.
Parts list
| Component | Est. cost | Notes |
|---|---|---|
| ESP32-CAM module (AI Thinker) | £6–8 | Includes OV2640 camera. Buy from Amazon or AliExpress. |
| FTDI USB-to-serial programmer | £3–5 | Required for initial firmware upload. Search 'FTDI FT232RL module' on Amazon. |
| IKEA 365+ 180ml glass jar with lid | £2 | New from IKEA or reused from eBay or Vinted. |
| 3.7V 1300mAh LiPo battery 883048 (JST-PH 2.0) | ~£5 | 8.8×30×48mm — fits inside the 180ml jar. Search '883048 3.7V 1300mAh JST PH2.0' on AliExpress. Confirm PH2.0 connector before ordering. Gives ~3–4hrs recording. |
| XL6019 boost converter (3–35V to 5–40V, screw terminals) | £3–5 | Steps up LiPo voltage (3.7V) to 5V for the ESP32-CAM. Screw terminals — no soldering required. Search XL6019 on Amazon. Set output to 5V before connecting. |
| 1S LiPo USB charger — 6 channel, JST-PH 2.0 (Tosiicop or similar) | ~£5 | Charges up to 6 batteries simultaneously via USB. Supports JST 1.25 and JST-PH 2.0. Search '1S LiPo 6 channel charger JST PH2.0' on AliExpress, or find on Amazon for faster delivery. |
| Two colours of thin rope or paracord (1m each) | £2–3 | One colour per side of lid — indicates camera direction. |
| Drill + 4mm drill bit | — | For rope holes in the lid flaps. Borrow if possible. |
| Jumper wires (female-to-female) | £2 | For connecting FTDI to ESP32-CAM. Search jumper wires on Amazon. |
| Small screwdriver (flathead) | — | For tightening the XL6019 screw terminals. Most people have one. |
Safety first
⚠ Read before you begin
Personal protective equipment
Wear safety glasses when drilling. Flying plastic fragments can cause serious eye injury. Wear gloves when handling drilled lids — edges can be sharp. Work in a well-ventilated space.
Microplastic disposal
Drilling through plastic lids produces fine particles. Do not drill near water or drains. Collect all swarf and plastic debris on a sheet of paper or card, fold it up, and dispose of it in general waste — never rinse it down a sink or allow it into the environment. This project exists to observe aquatic ecosystems — protect them from the very start.
Electrical safety
Always disconnect the battery before wiring. Never submerge a camera that has not been fully sealed and leak-tested. Do not use mains power for underwater deployment — battery only.
Waterproofing
Always leak-test in a bowl of water for 30 minutes before any field deployment. Watch for bubbles — any escaping air indicates a failed seal.
Wiring & setup
The ESP32-CAM needs to be programmed once via an FTDI USB-to-serial adapter before use. After programming, it runs independently from the LiPo battery with no computer required.
Connect FTDI to ESP32-CAM
Wire the FTDI adapter to the ESP32-CAM using female-to-female jumper wires: GND→GND, VCC (5V)→5V, TX→U0R, RX→U0T. To enter programming mode, also connect the IO0 pin to GND. Remove this wire after programming.
Upload the firmware
Download and install the Arduino IDE (free). In Preferences, add this URL to Additional Boards Manager URLs:
Go to Tools → Board → Boards Manager, search "esp32" and install the Espressif package. Then select AI Thinker ESP32-CAM as your board. Open File → Examples → ESP32 → Camera → CameraWebServer. Enter your Wi-Fi name and password in the sketch, select the right COM port, and click Upload. Once uploaded, remove the IO0–GND wire and press Reset.
Find the camera's IP address
Open the Serial Monitor (Tools → Serial Monitor, 115200 baud). After reset, the ESP32-CAM will print its IP address. Open that address in a browser on the same Wi-Fi network. You should see a live video stream. Note the IP — you will use this to view footage in the field via a mobile hotspot.
Assembly
Prepare the rope system
The rope system tells you which direction the camera is pointing without opening the jar. Drill one 4mm hole in each of the two opposing lid flaps. Thread a short length of rope through each — use two clearly different colours (e.g. blue and orange). Tie a knot on the inside to secure. Always note which colour corresponds to which side before deploying. This is how you know where the camera is looking.
De-burr both holes carefully using a scalpel or pocket knife — run the blade lightly around the rim to remove any raised plastic edges before threading the rope. Collect all plastic swarf on a sheet of paper immediately after drilling and dispose of in general waste.
Mount the ESP32-CAM
Place a small piece of foam or adhesive velcro on the inside base of the jar. Press the ESP32-CAM onto it with the camera lens facing the base glass. The lens should be centred and as close to the glass as possible without touching. Route the USB cable through the jar opening — the cable exits under the lid, not through it.
Seal the jar
The Lite version requires no drilled cable hole and no cable gland. The USB cable simply runs under the edge of the lid when closed — the jar's rubber seal provides enough compression to make it watertight. Press the lid down firmly. The rope handles sit outside the jar and can be used to position and retrieve it.
Connect the power circuit
Before connecting anything, set the XL6019 output to 5V using a small flathead screwdriver on the potentiometer. Turn the pot and measure the output with a multimeter until it reads 5.0V — do this before connecting the ESP32-CAM.
Strip the bare wire ends from the LiPo's SM-2Pin JST pigtail (red = positive, black = negative). Insert them into the XL6019 input screw terminals (IN+ and IN−) and tighten with a screwdriver. Connect short wires from the XL6019 output terminals (OUT+ and OUT−) to the ESP32-CAM's 5V and GND pins. No soldering required — screw terminals grip the bare wire ends directly.
Charging the LiPo: When the battery is low, open the jar and unplug the LiPo's JST-PH 2.0 connector from the XL6019. Plug it into any port on the 6-channel USB charger, and connect the charger's USB-A plug to any USB charger or laptop. The per-port LED will indicate charging status — typically red while charging, off when full. Set the charger to 0.6A for a 1300mAh battery (1C rate). A full charge takes approximately 2 hours. Never charge while the jar is sealed or submerged.
⚠ LiPo safety
Never charge a LiPo unattended or near flammable materials. Do not puncture, crush, or short-circuit LiPo cells. Always use the dedicated USB charger cable — never connect the LiPo directly to a USB port. Dispose of swollen or damaged batteries at a household hazardous waste facility.
Test before deploying
Power on by connecting the LiPo. Connect your phone to the same Wi-Fi hotspot the ESP32 was configured with. Open the camera's IP address in your phone's browser to confirm the live stream. Seal the jar and submerge in a bowl of water for 30 minutes to check for leaks before field use. A 1000mAh LiPo provides approximately 1.5–2 hours of streaming. A 2000mAh battery extends this to 3–4 hours.
Key principles
Rope orientation
The two-colour rope system is essential. Always photograph or note which colour faces which direction before you place the camera. Without this you cannot be certain what your footage shows.
No specialist tools needed
The Lite version is designed to be buildable by anyone — no soldering iron, no 3D printer, no specialist equipment. Everything is off-the-shelf and assembled by hand. The waterproofing is equivalent to the XL.
LiPo care
Always recharge using the dedicated 6-channel USB charger — never connect the LiPo directly to a USB port. Disconnect the JST-PH 2.0 connector from the XL6019 before charging. Store at partial charge (around 50%) if not using for extended periods. A swollen or damaged battery should be disposed of safely, never used.
Microplastic awareness
Even drilling two small holes creates plastic particles. Use a piece of paper beneath the work area and dispose of all debris carefully. Never work near water.
Next step
Deploy your camera
Once built and tested, learn how to place your camera responsibly and capture useful footage.
Deploy →